ioxcom Documentation
ioxcom is a native, cross-platform and affordable intercom / push to talk system, it can also do simple text messaging and location sharing.
Latest version is available at
Introduction
ioxcom is system which includes two main components - server and client. Server is installed by system administrator, and clients are available to download for each user.
Server
Server is an executable file which can be run on Windows, Linux (aarch64 and x86) and MacOS (Apple Sillicon). It should be installed on good network, preferably in cloud, geographically close to where users will connect to.
Server is by default using port 45124 - both TCP (Web interface) and UDP (For Server-Client communication). When creating server, make sure to have at least 45124:UDP open.
Each architercture has some specifics which can be seen in following sections. In general you will need to run executable, make it run as service to persist during installs. You will also need to get license - free trial available for 2 weeks.
How to install
Windows
1. Download latest version from above.
2. Once downloaded, unpack it to folder.
3. run ioxcom-server.exe
4. see terminal window. You should see http://x.y.z.w:45124 - hold control and click on it to open interface
in default browser
5. documentation continues at docs-server-how-to-use
Linux
Download .zip from above and extract to directory
unzip ioxcom-server....zip
To run right away, simply start ./ioxcom-server Make sure it has executable permission
chmod +x ioxcom-server
To make as system service use these commands
Above script downloads and installs system service in your logged in user home folder.
MacOS
1. Download
2. double click to unpack
3. Open terminal
4. Navigate to folder
5. run ./ioxcom-server
6. Open suggested url such as http://127.0.0.1:45124
Update
- 1. Download new version
- 2. Copy previous executable if you want to keep fail-safe version
- 3. Stop server
- 4. Make copy of config.toml when server is stopped
- 5. Unpack and rename new version
- 6. Restart service
How to use
Once your server is running, open [server-ip]:45124 in browser. You can also check console output and see available urls there.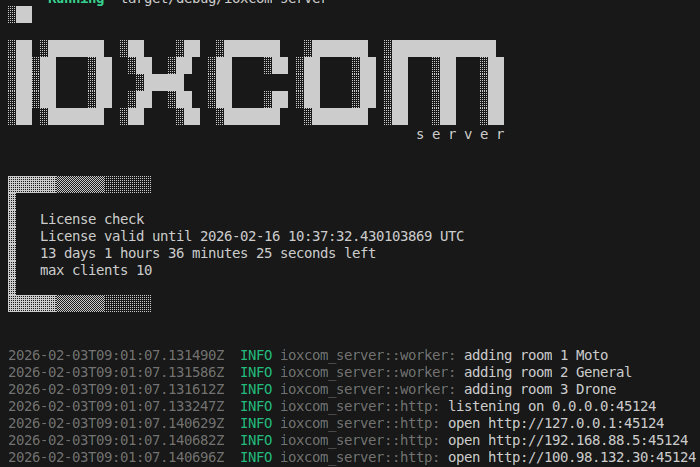
If you are using systemd on Linux, run journalctl --user-unit=ioxcom-server to see logs.
Web interface will open. Everybody with access to web url has access to this administration.
Users section
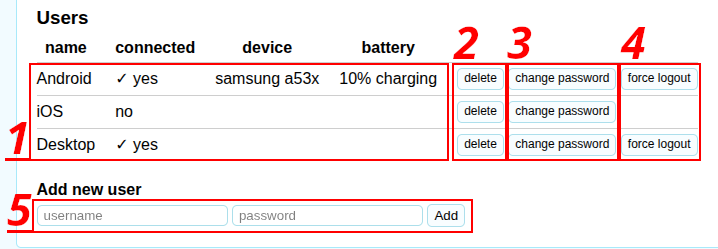
- 1. List of users, you can see device name and battery status if available
- 2. Delete users
- 3. Change password
- 4. Force logout - for example change password and then log-out acts like ban
Map
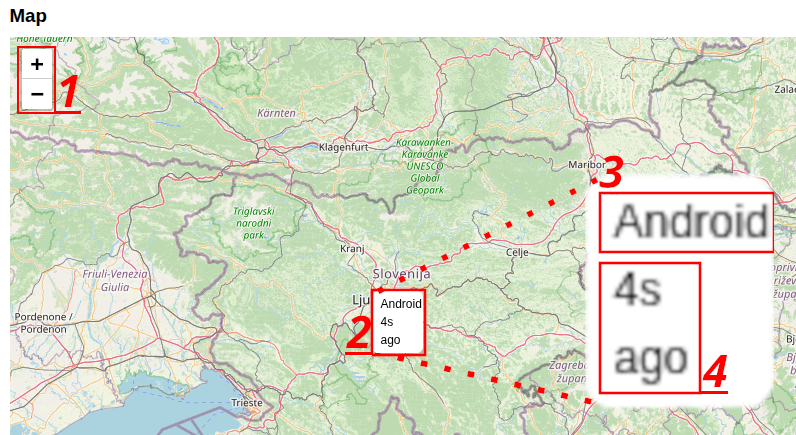
- 1. Zoom in/out, also with mouse or pinch
- 2. Location of device
- 3. User name
- 4. When was this location last updated
Groups
Groups are logical units that are used for quicker access control. For example create group Moto, assign users to this group. Then in room use this group to allow listen/talk.
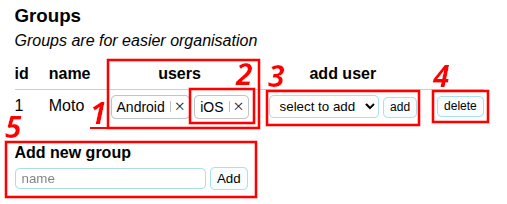
- 1. Users in this group
- 2. User in this group - click to remove
- 3. Select user from a list and add
- 4. Delete group
- 5. Enter new group name and add
Rooms
Each room has membership. Everybody with access (must be able to listen) can join and listen in client application. Selected users/groups can also talk in rooms.
Each room also has own messages.
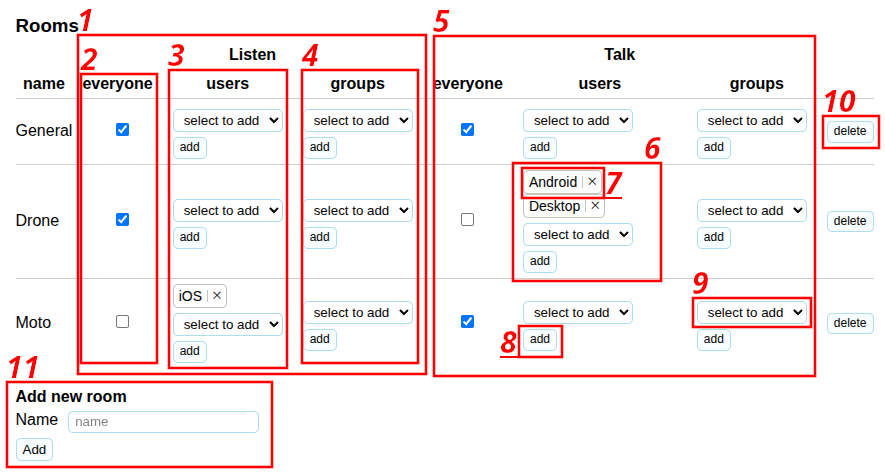
- 1. Listen access
- 2. Everyone can listen
- 3. Selected users to listen
- 4. Selected groups to listen
- 5. Talk access
- 6. List of talk users
- 7. User with talk access - click to remove
- 8. Select and add user to talk access
- 9. select and add group to talk access
- 10. delete room
- 11. type unique name and add new room
Statistics
You can see realtime statistics.
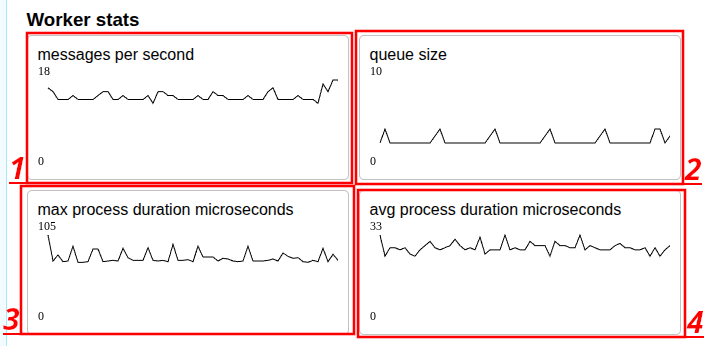
- 1. Processed messages per second - each data packet sent between server and client counts
- 2. How many messages are in queue, if growing, server can not handle the load
- 3. Maximum time message was processing per interval. 1000 microseconds = 1 millisecond
- 4. Average process time for messages in interval
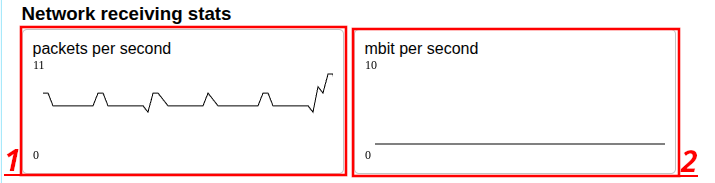
- 1. packets IN - to server per second
- 2. mbit per second IN. 1mbit = 0.125MB
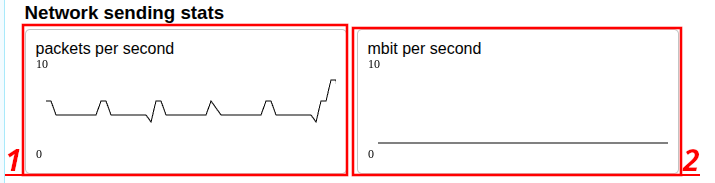
- 1. packets OUT - to clients per second
- 2. mbit per second OUT. 1mbit = 0.125MB
Open ports
To allow clients to connect to your server, make sure to open port UDP:45124 and make port forwarding/NAT if needed.
To allow clients to access Administration, open port TCP:45124
Domain
Domain/subdomain can simply be used if you point it to your ip.
For web administration - if your domain requires https (such as .dev domain), use reverse proxy such as Caddy, or use tunneling service such as Cloudflared
For clients, you only need to make A record to point to correct IP.
Clients
general
Windows, Macos and Linux are sharing same GUI philosophy. Android and iOS are using native interface.
Audio backend is different for each platform. Windows is using WASAPI, MacOS and iOS are using Core Audio, Linux is using pipewire and Android is using AndroidAudio
For desktop clients, audio works best if you first set default communication devices are set correctly and sample rate is set to 48000, then run application.
On mobile devices, sometimes sound is set too low. First set mobile device volume higher.
Android client
Android application is available at Google Play Store.
Once downloaded, open application. You will be asked to allow audio/microphone permission. Set to always allow.
Log in
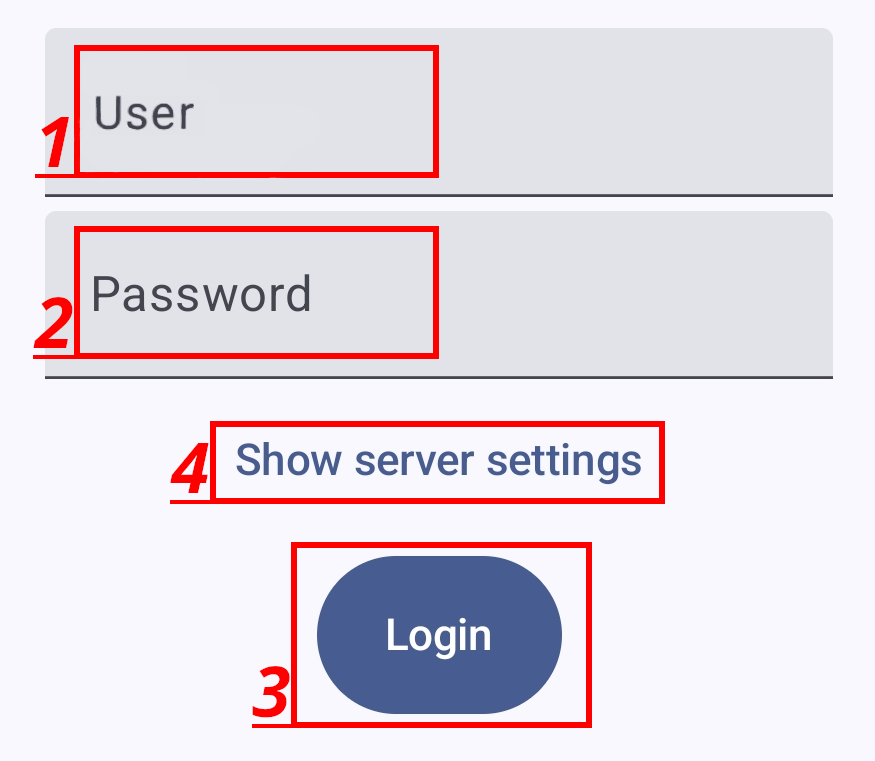
- 1. Your username
- 2. Your password
- 3. Logs in. If nothing happens check if you have connection to network, and if UDP port is open on server
- 4. Toggle server setting visibility
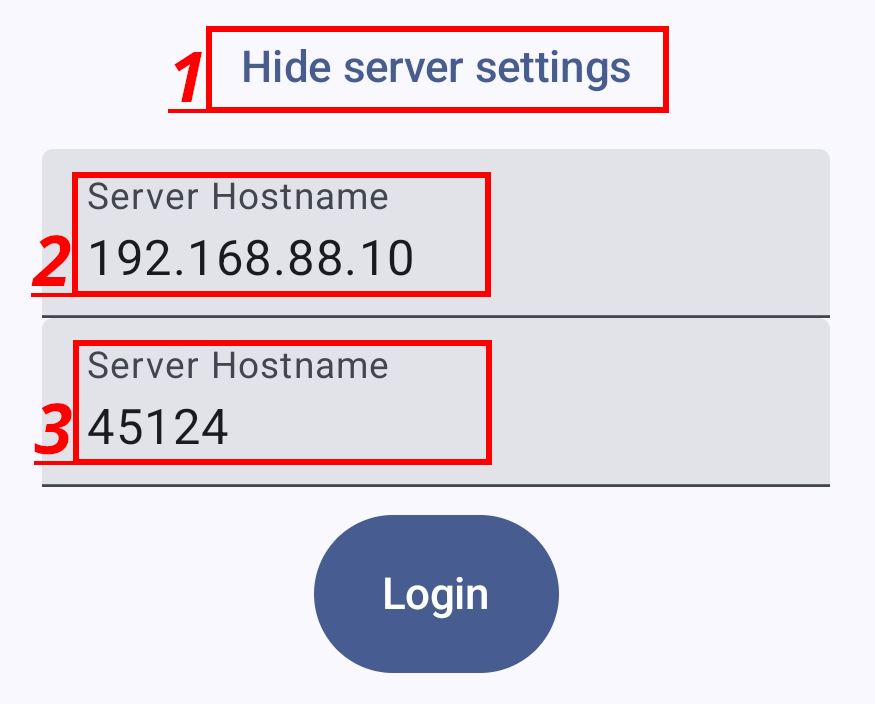
- 1. Toggle server setting visibility
- 2. IP or Hostname to server
- 3. Change default port
Menu
When opening menu

- 1. Main window - talking
- 2. Settings
- 3. Rooms selection
- 4. Messaging
Main screen
Talk to rooms/users
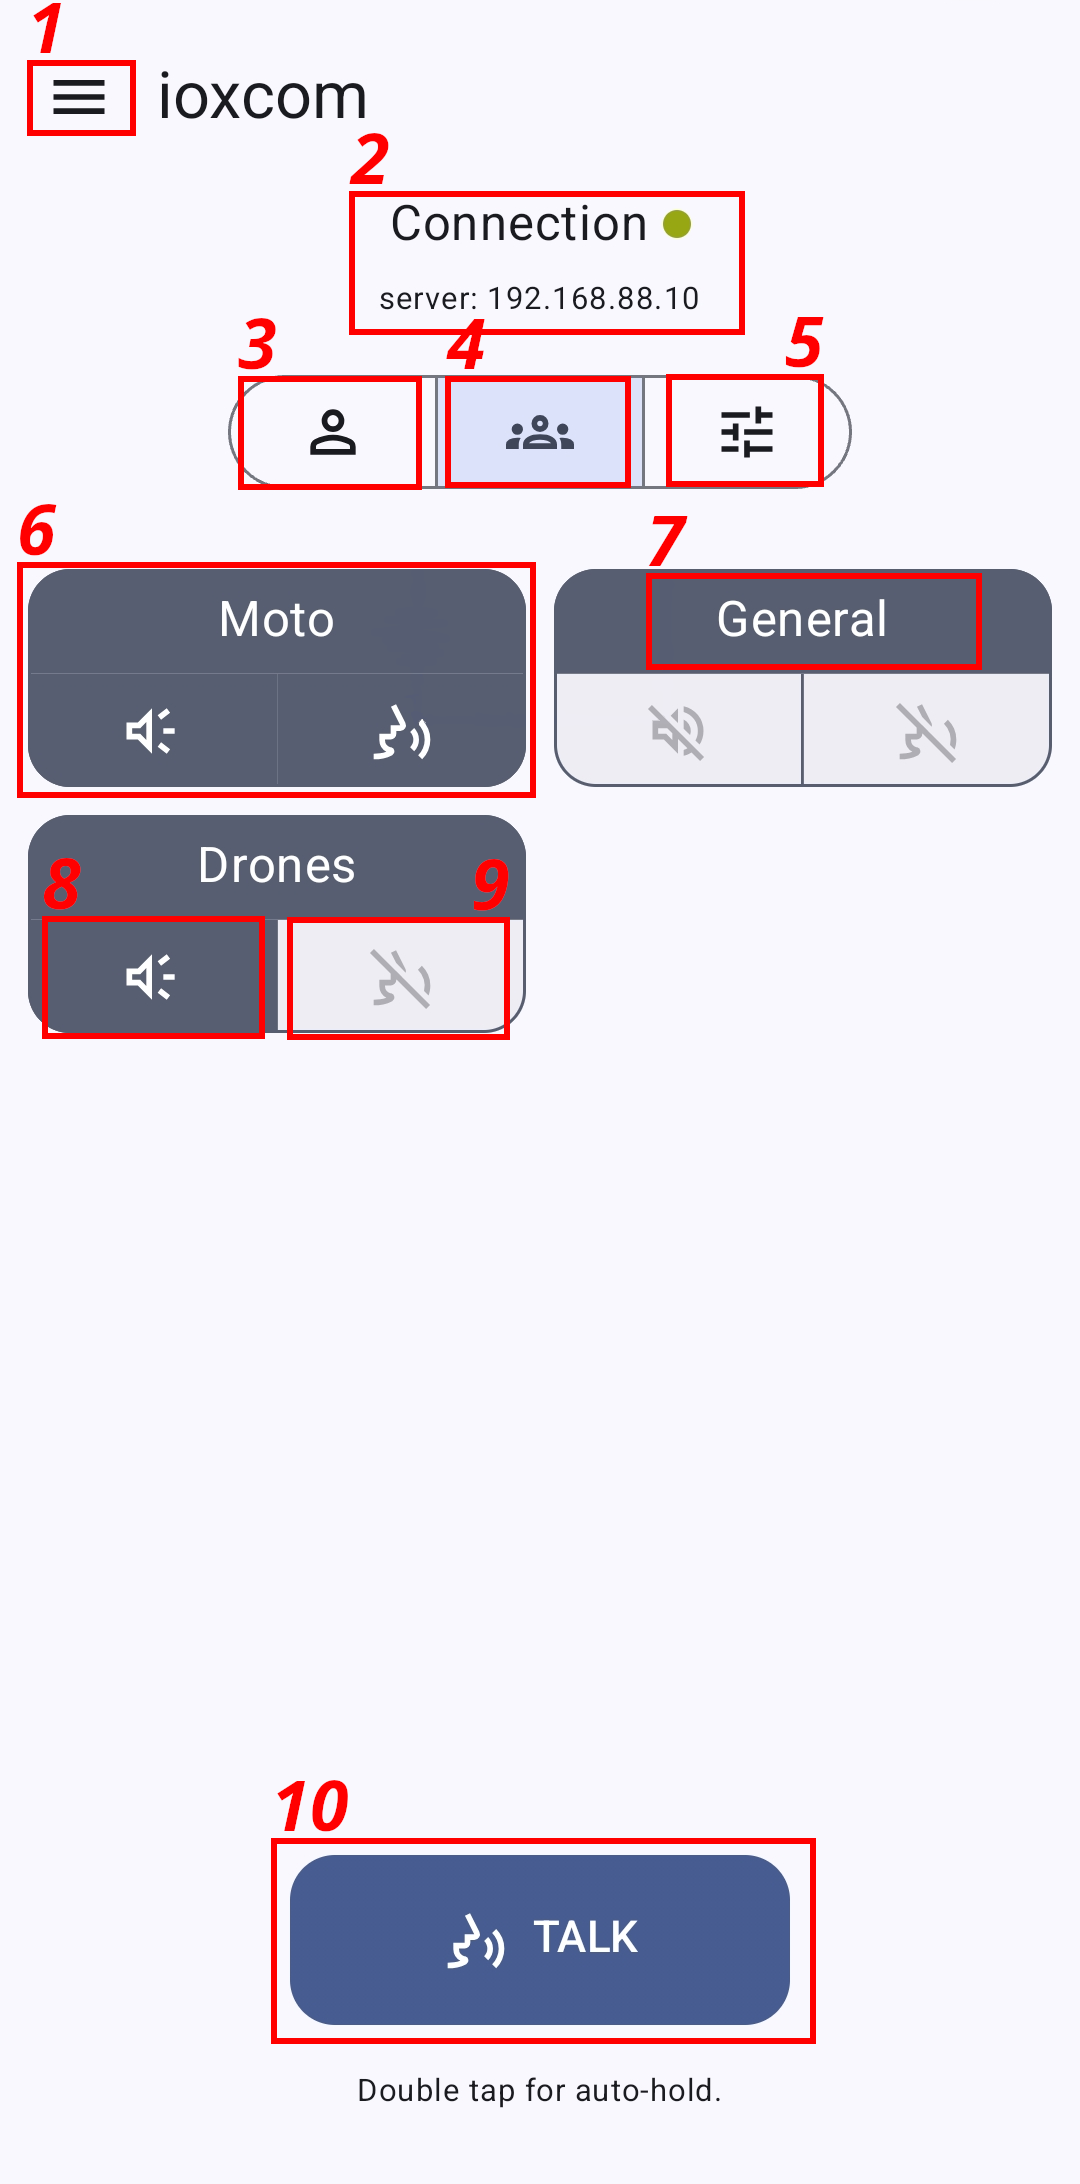
- 1. Open menu
- 2. Connection info - click for more details
- 3. Show/Toggle users view.
- 4. Show/Toggle rooms view.
- 5. Toggle audio volume mixer.
- 6. Room with listen/talk settings
- 7. Room name
- 8. Listen to this room
- 9. Talk to this room when 10. is pressed
- 10. Talk to selected rooms
Audio mixer
If you want to make YOURSELF louder to others (for example you have quiet microphone), enable Mic level and slide to other half. If microphone is too loud, slide to left.
If you want to make OTHERS louder (for example they have bad micophone, or you have very quiet spekaer set to max), slide OUT to left or right.
Both options will have max loudness, but will not clip.
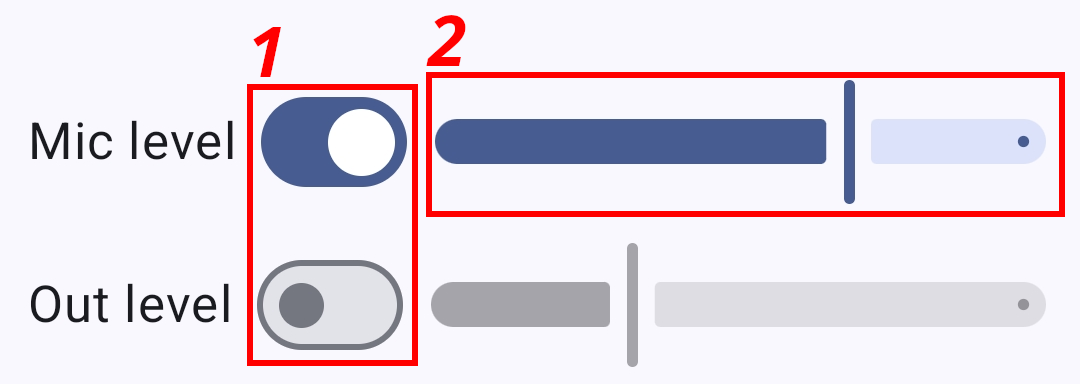
- 1. Activate volume mixer
- 2. Microphone gain
Settings
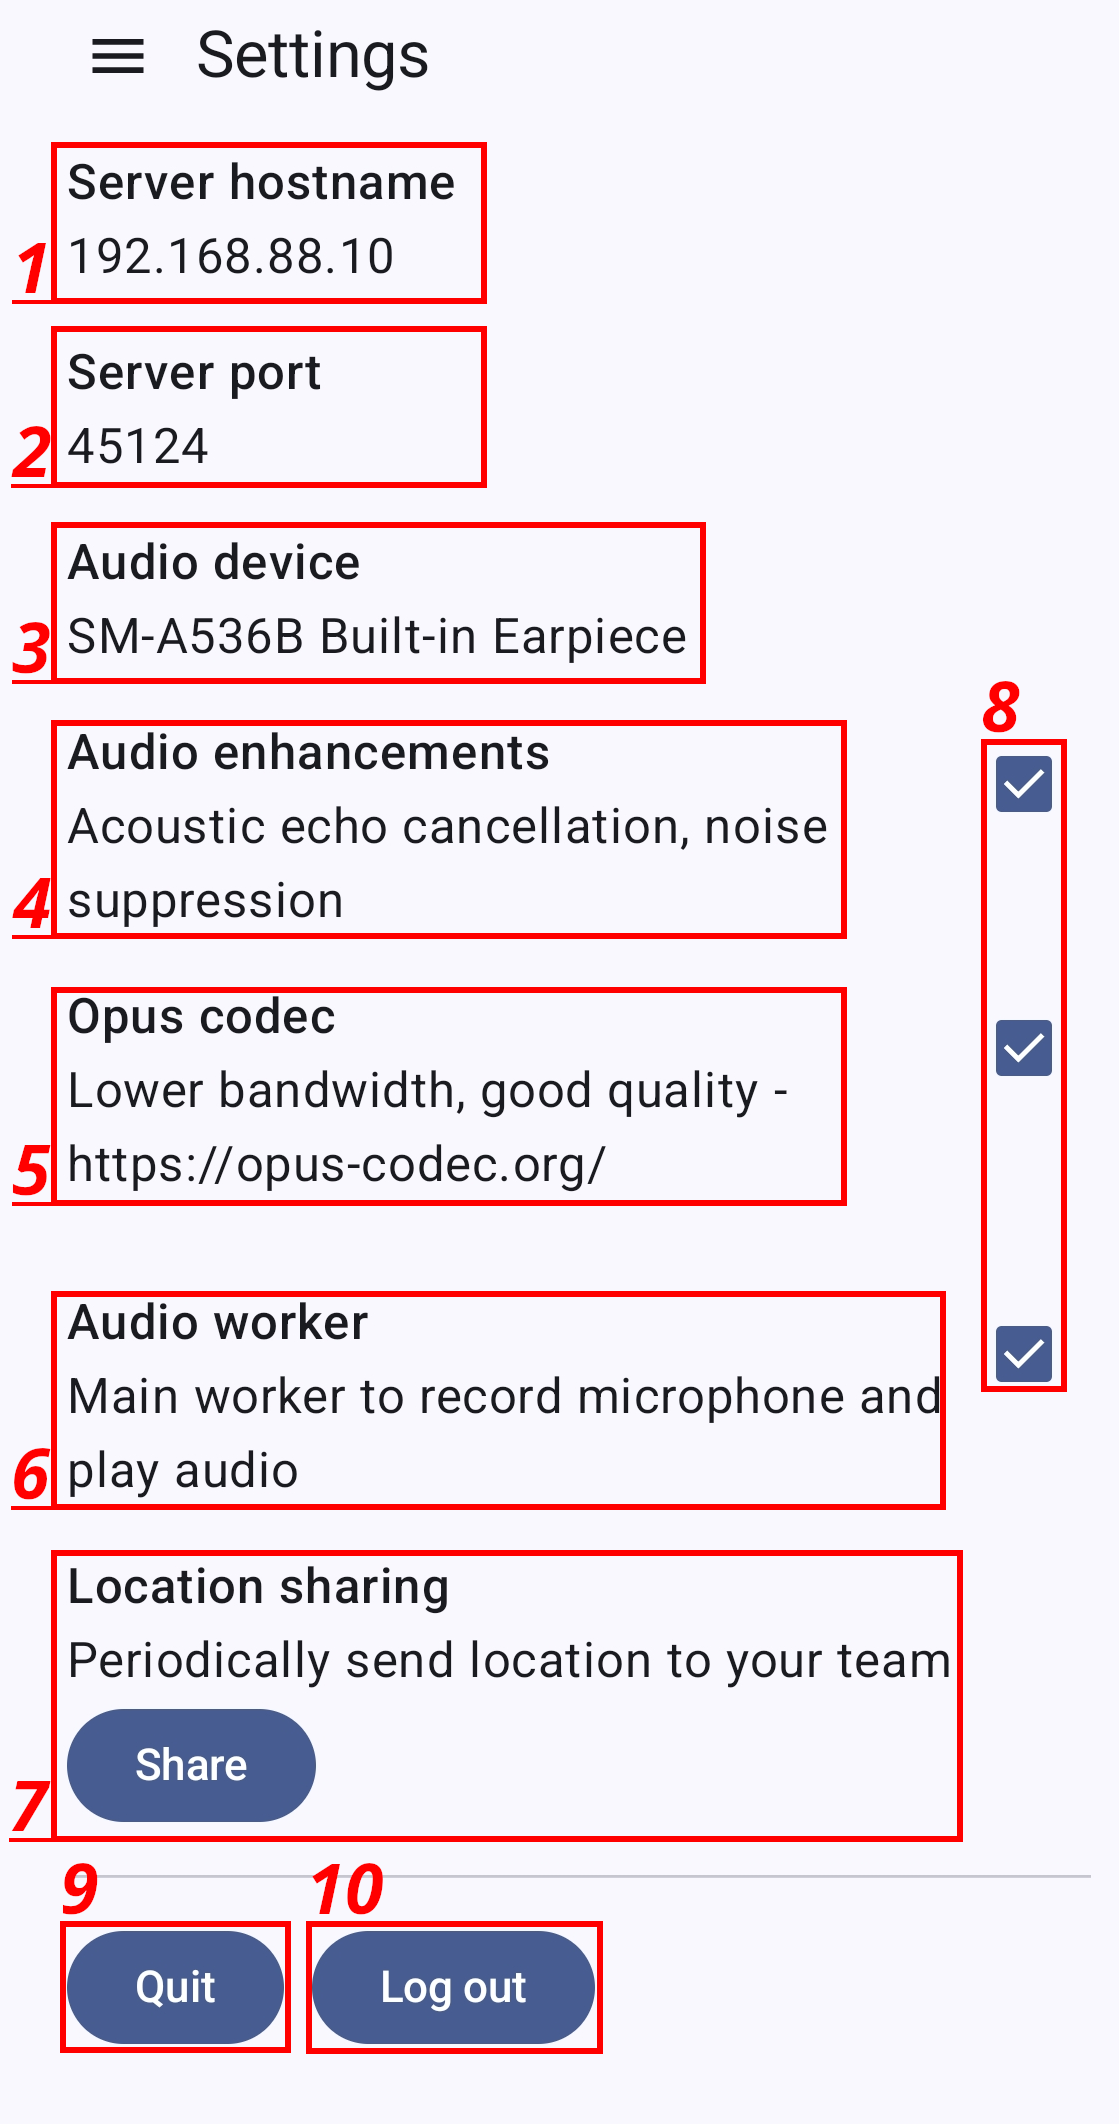
- 1. Hostname or IP to server
- 2. Change default port
- 3. Which device is used. Bluetooth appears here. Make sure to check if you are connecting to headphones as it might jump to wrong one.
- 4. Enable/Disable AEC. If two devices are in same room with AEC enabled, it might cancel each other out.
- 5. use Opus codec - 20kbps. If using original 1mbps is needed per channel - 48000hz/16bit.
- 6. Enable/disable audio capture and playback
- 7. Share location for selected period
- 8. Use checkboxes to enable-disable setting left of it
- 9. Quit application - only closing application still consumes CPU/memory and audio worker is still active.
- 10. Log out from server.
Rooms
Select which rooms you want to have on main screen. This is available to allow users select only one quick access group for example.
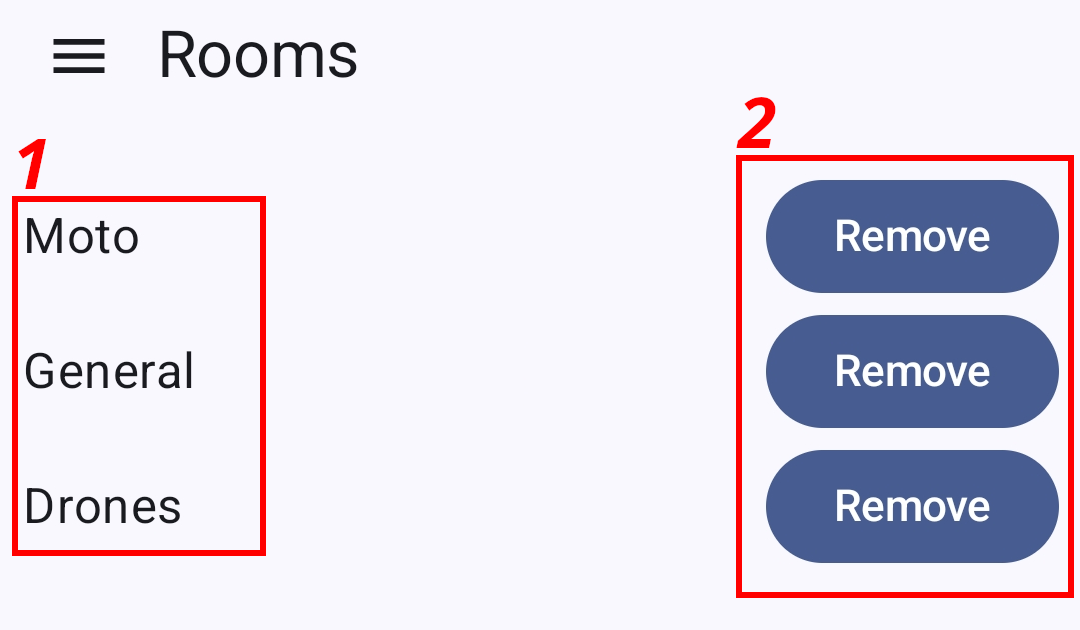
- 1. Group name
- 2. Add/remove button
Messaging
Simple messaging system is available to use, for example when network access is bad.
Three different main groups are available
- announcement channel - everyone has access
- each room has own channel
- each client has own channel
Click on each channel to open chat.
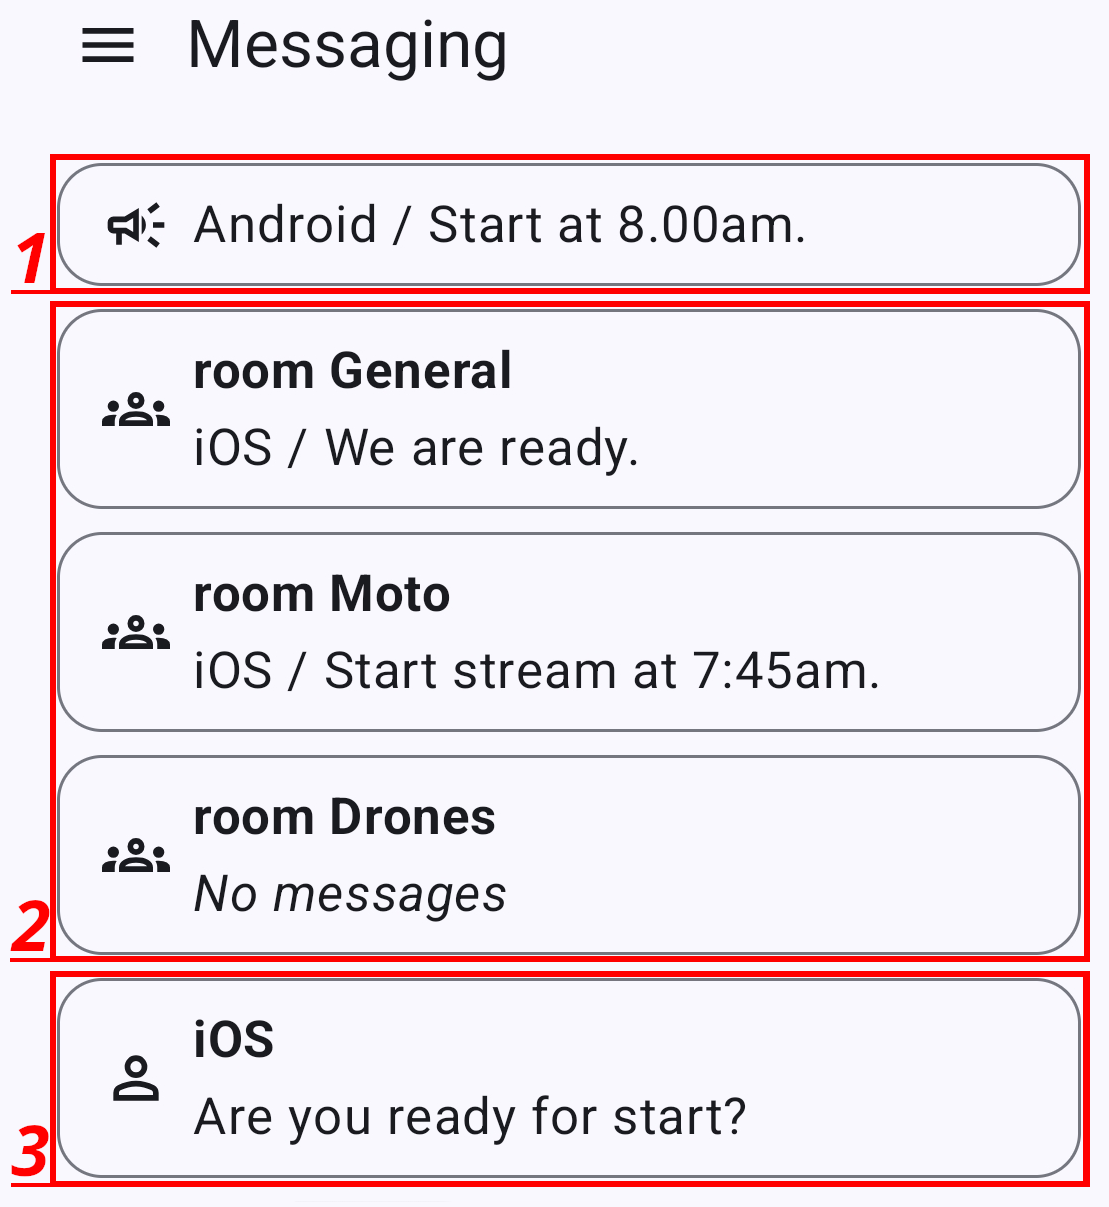
- 1. Notification channel
- 2. Rooms
- 3. Users
Chat screen
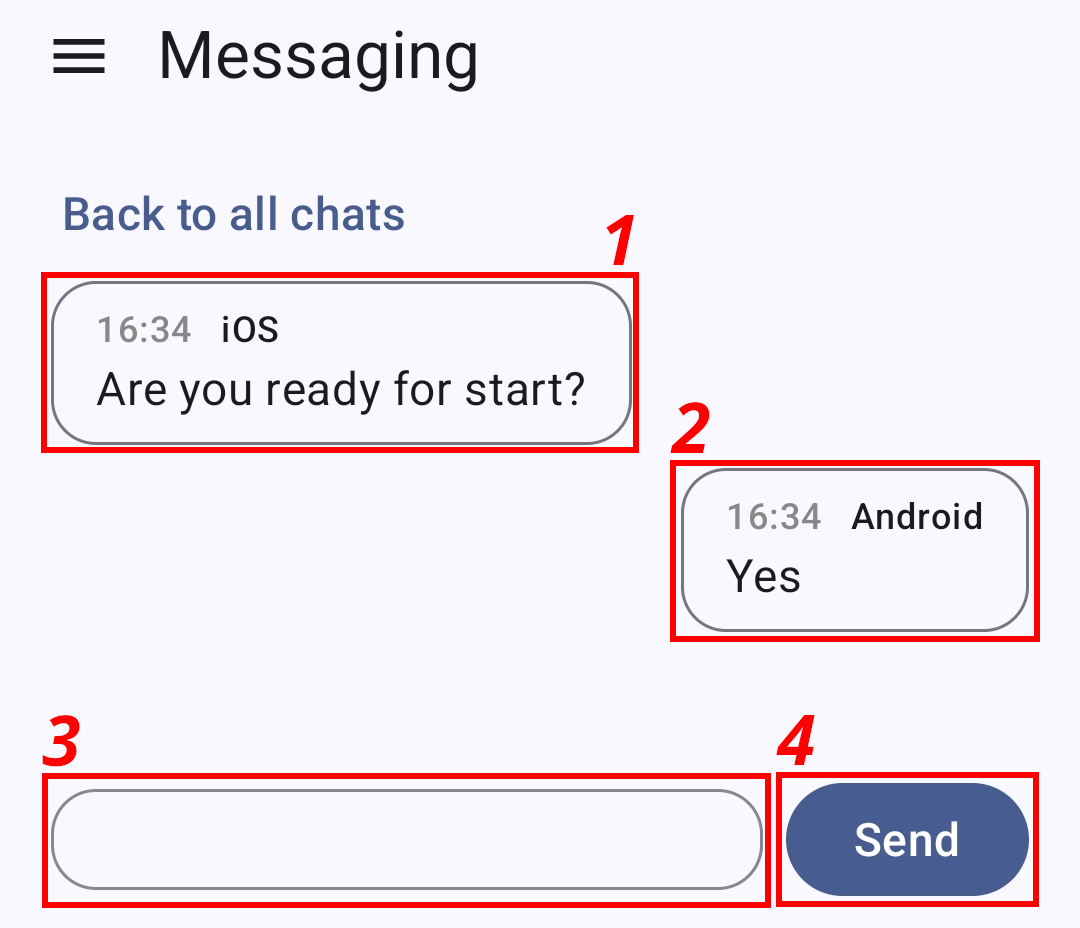
- 1. Other side message
- 2. Your messages on right
- 3. Type new message
- 4. Send it
iOS client
iOS version is available on Apple App Store When you open application, this is the screen that you will see. You will have to enter username and password.
Also, make sure to set Server settings to correct hostname.
When you open application, this is the screen that you will see. You will have to enter username and password.
Also, make sure to set Server settings to correct hostname.
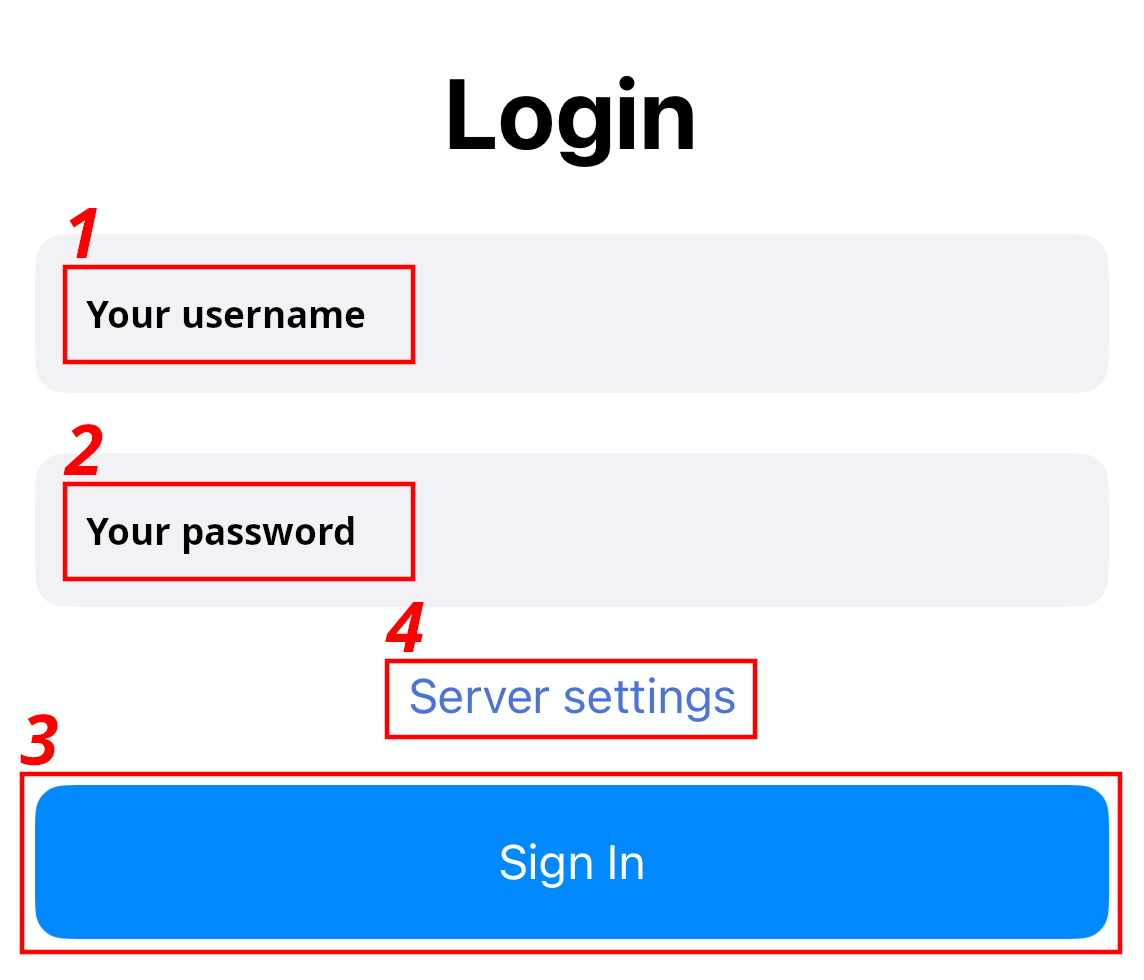
- 1. Username set in admin
- 2. Password set in admin
- 3. Sign in into server
- 4. Toggle server settings (hostname and port) form
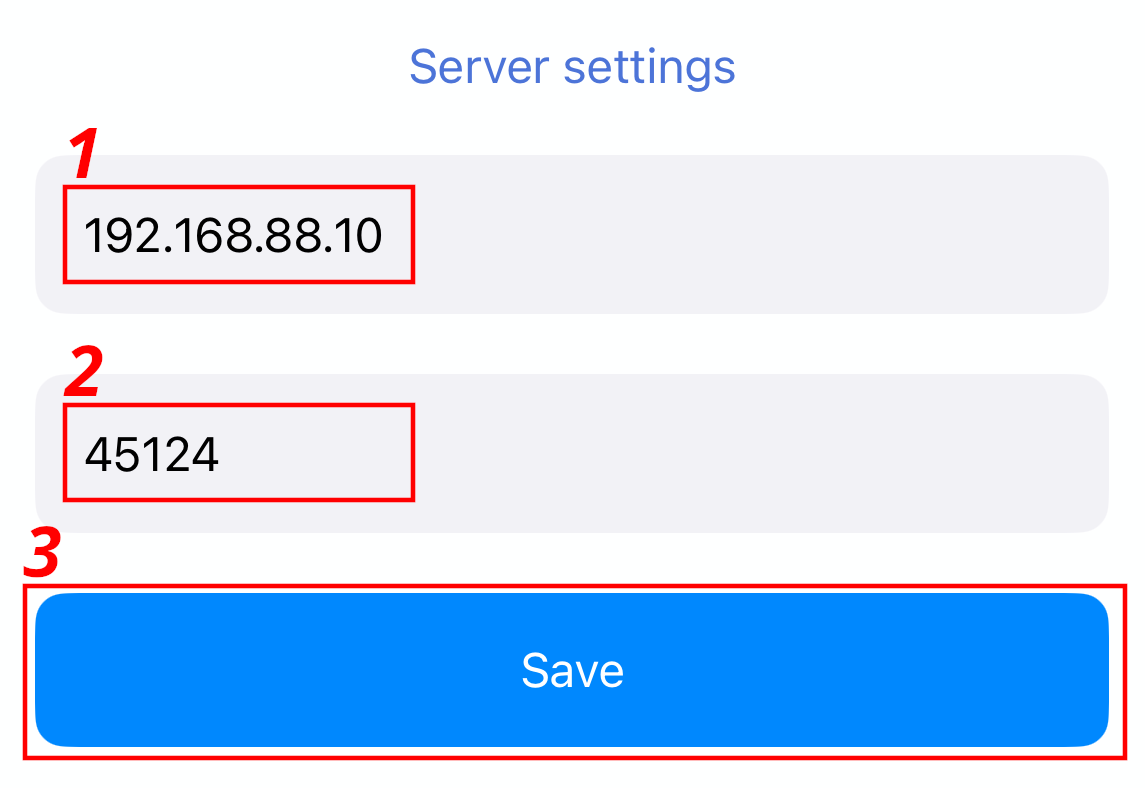
- 1. Hostname or IP of server
- 2. Network port where server is reachable
Main screen

- 1. Quick access menu
- 2. Server connection info - click to see details
- 3. Talk/Listen room
- 4. Room name
- 5. Listen to room
- 6. Talk to room when 7 is pressed
- 7. Talk to selected rooms
Quick access menu
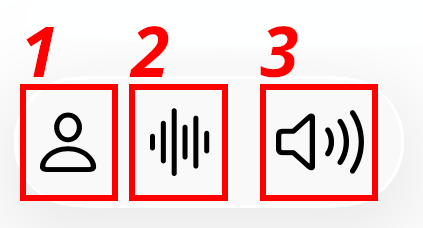
- 1. Change between room / user view
- 2. Show/hide audio volume mixer
- 3. Select audio device
Audio volume mixer
If you want to make YOURSELF louder to others (for example you have quiet microphone), enable Mic level and slide to other half. If microphone is too loud, slide to left.
If you want to make OTHERS louder (for example they have bad micophone, or you have very quiet spekaer set to max), slide OUT to left or right.
Both options will have max loudness, but will not clip.
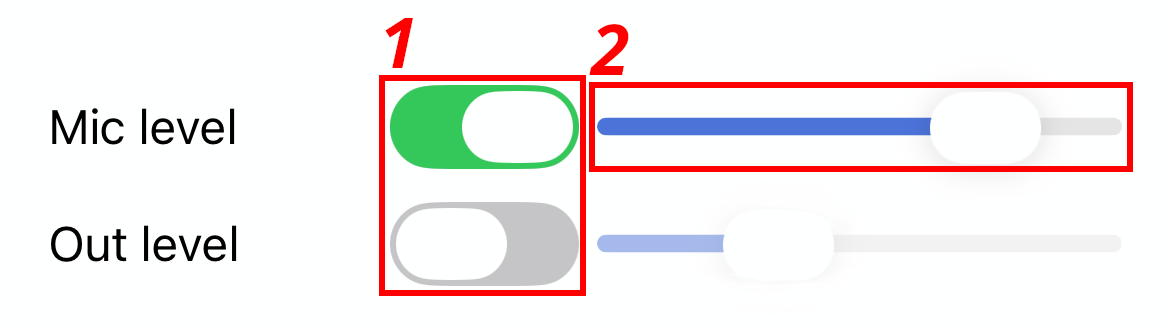
- 1. Buttons to turn on or off
- 2. Slider for Mic level
Audio device selector
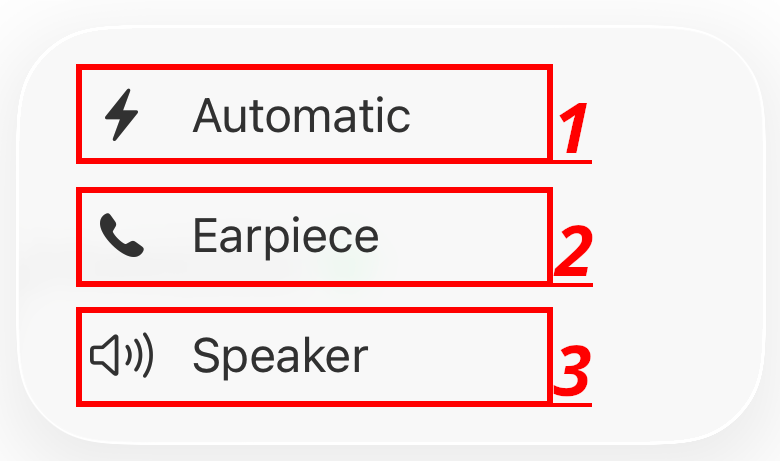
- 1. Automatic = changes between connected devices for example when connecting to bluetooth
- 2. Only earpiece / if you want to use without speaker
- 3. Speaker
Messaging
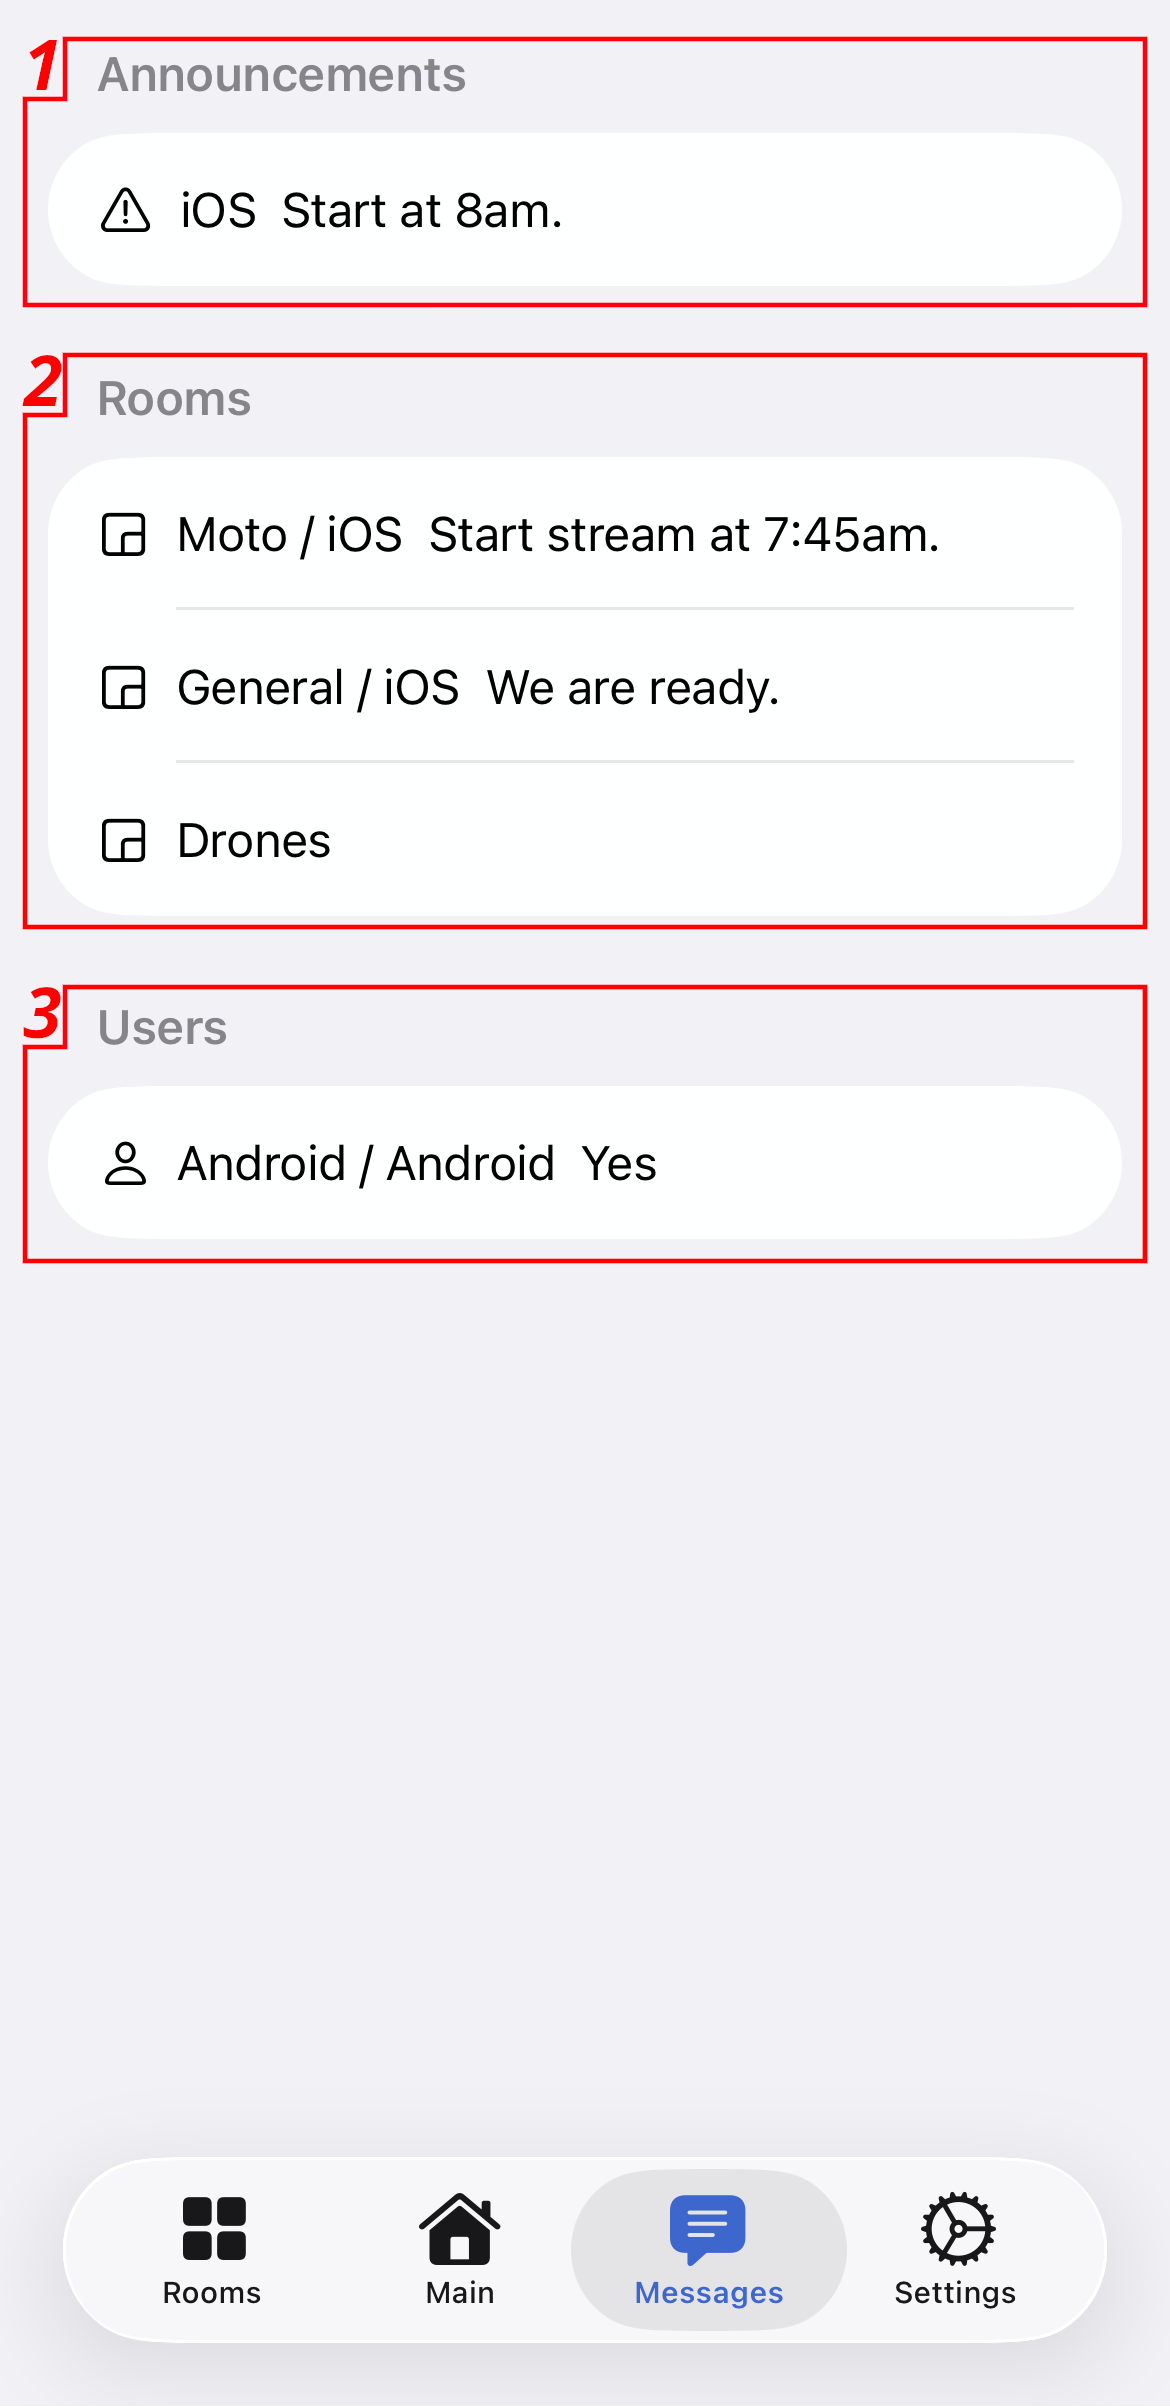
- 1. Announcement channel with latest message
- 2. Rooms channels with latest message and user
- 3. Users channels
Messaging channel
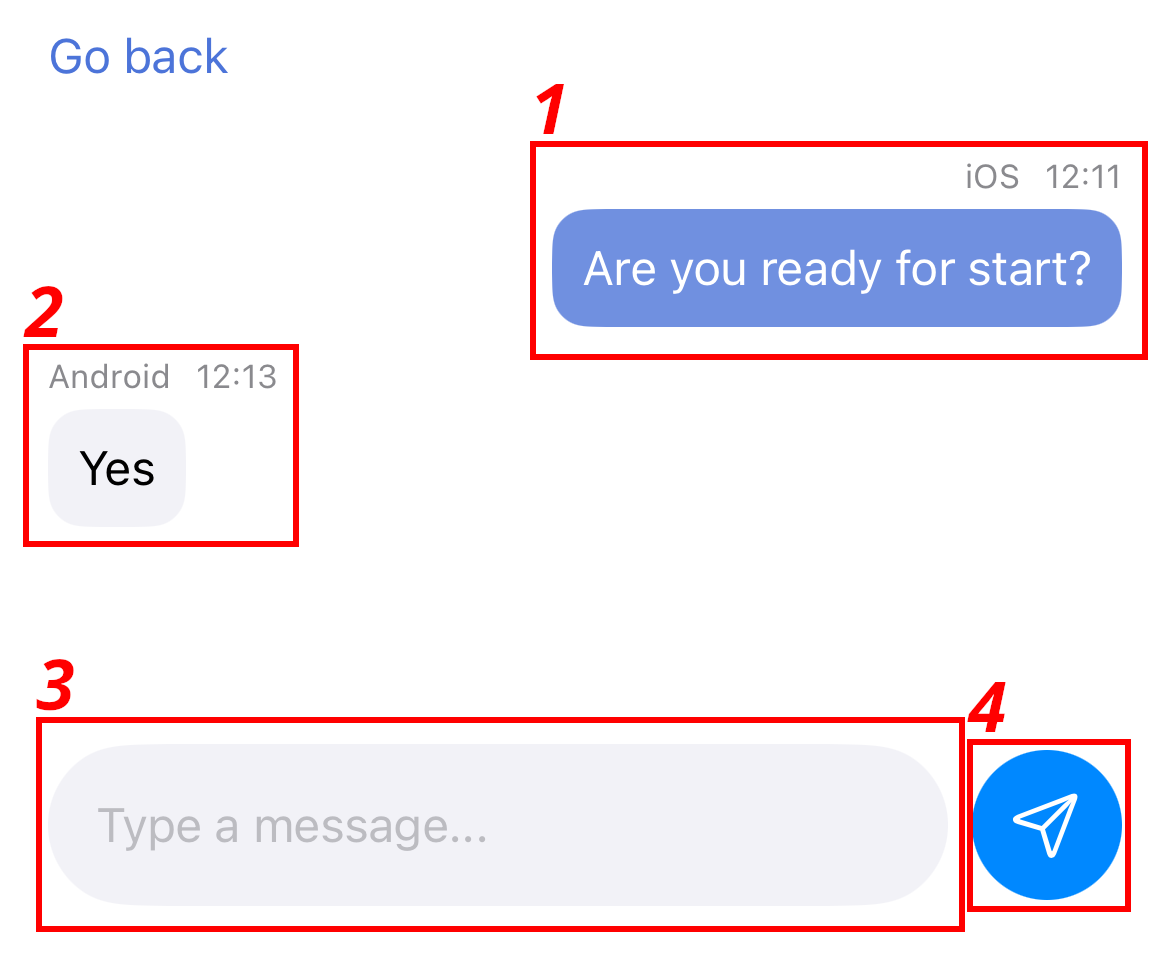
- 1. Your messages on right
- 2. Others on left
- 3. Type new message text
- 4. Send to selected chat
Rooms selector
Select which rooms you want to see on main talk screen
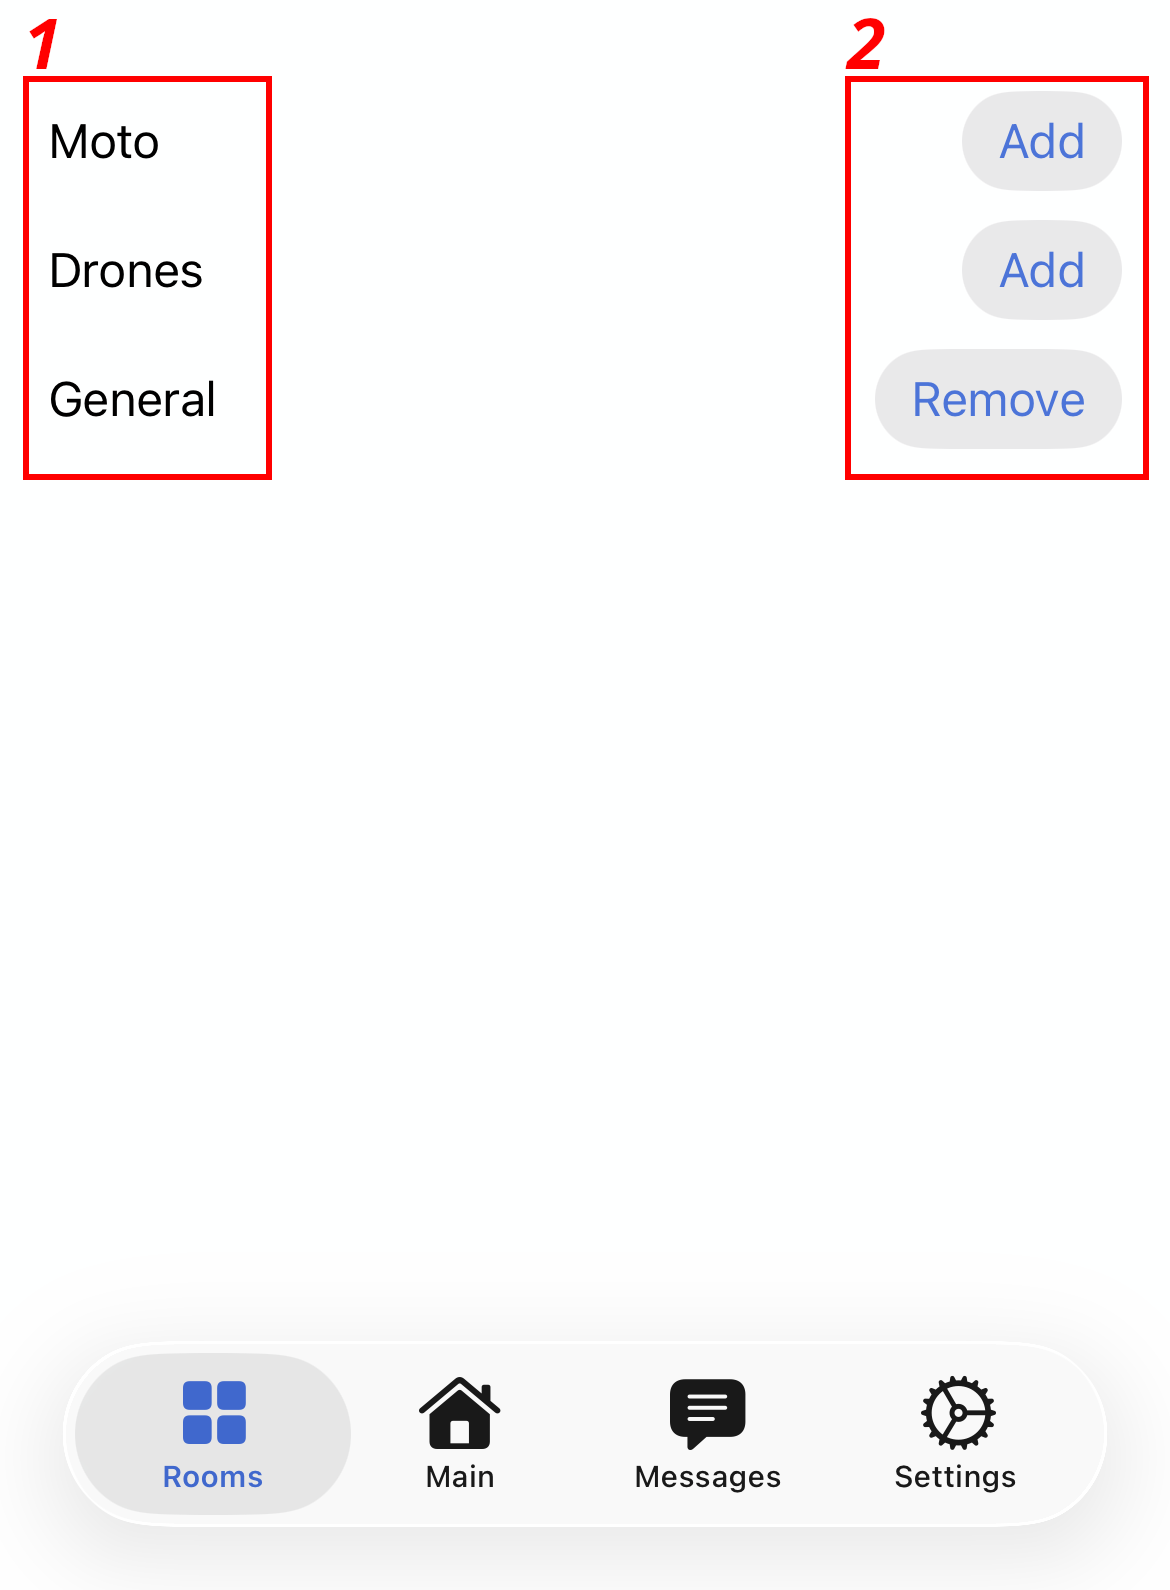
- 1. list of rooms
- 2. add/remove from home screen
Settings
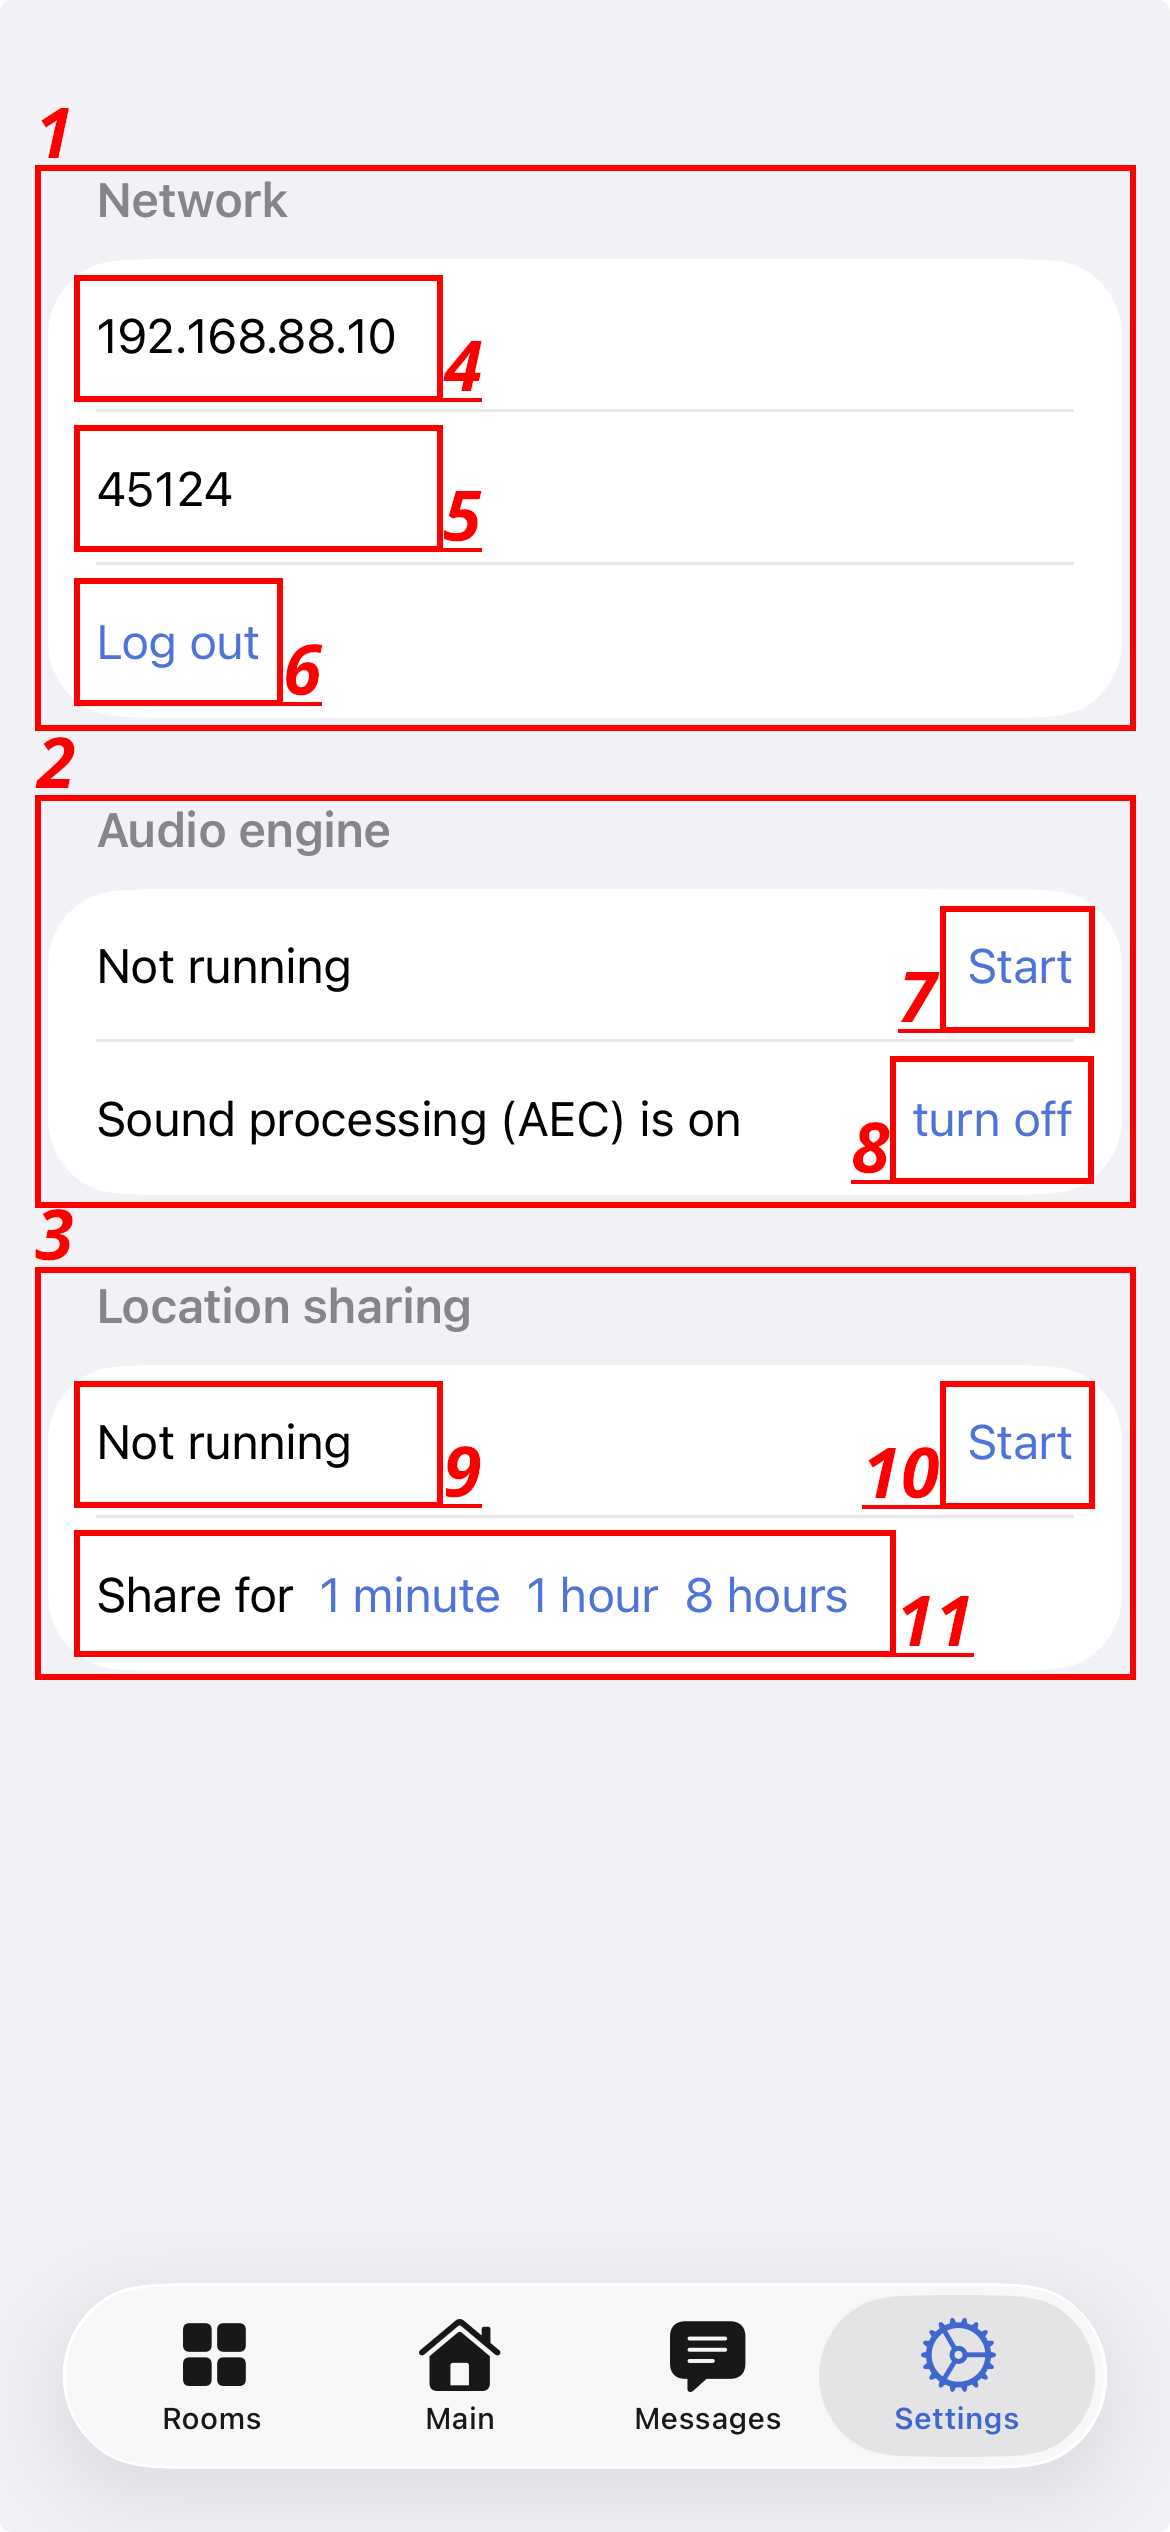
- 1. Network settings
- 2. Audio settings
- 3. Location sharing
- 4. IP or hostname to server
- 5. Network port to use to reach server
- 6. Log out
- 7. Start or stop audio engine (microphone+playback)
- 8. turn AEC on or off
- 9. Location sharing status
- 10. Start location sharing
- 11. Start location sharing with time limit
Desktop client
Main talk screen
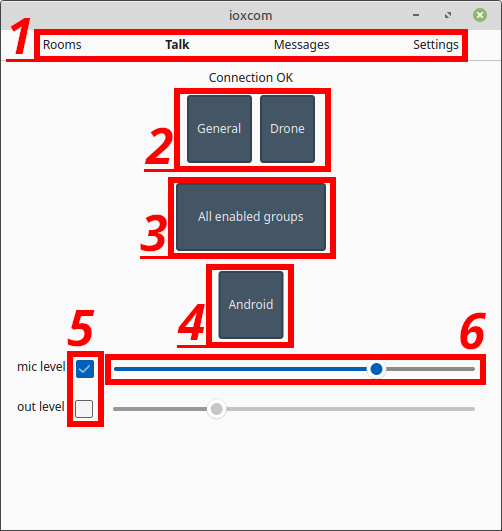
- 1. Main menu to enable different screens
- 2. Talk directly to single room
- 3. Talk to rooms which have TALK enabled in rooms screen
- 4. Talk to single users
- 5. Enable/disable mic or output audio gain
- 6. How much gain is applied - middle is normal, left is less, right is more
Settings
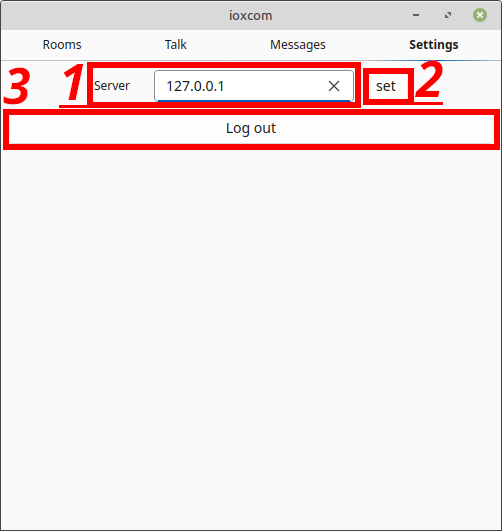
- 1. Server hostname or IP
- 2. Set to save settings
- 3. Log out
Messaging
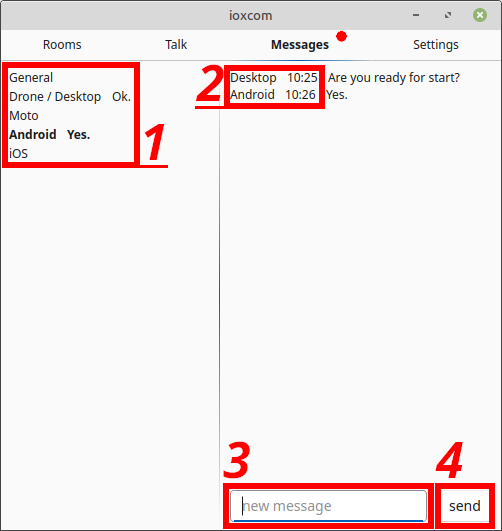
- 1. Channels list - announcement, groups then users. Bolded is selected
- 2. Showing selected channel messages, who wrote when
- 3. New message text
- 4. Send new message
Rooms settings
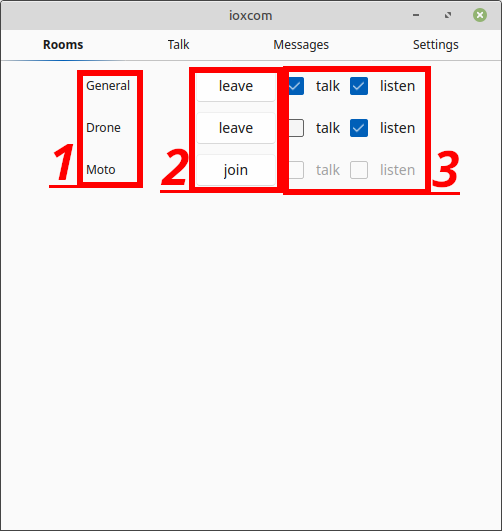
- 1. Room list
- 2. Add or remove from home screen
- 3. Select to listen or talk with main TALK button to room